Ultrasonic Composite Machine Warranty Instructions
Nov 02, 2021
Before using the new ultrasonic composite machine, you must read the manual of the ultrasonic quilting machine and be familiar with the content of this manual.
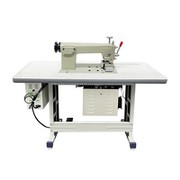
1. Function description of each part of machinery
1) Adjust the nut: limit the length of the cylinder stroke.
2) Pressure roller cylinder: control the pressure roller to rise and fall.
3) Pressure wheel switch: The pressure wheel control switch is on the left side of the machine head. Click the pressure wheel to drop
4) Mould base: fixed flower wheel.
5) Flower wheel: a mold for sewing and cutting processed parts.
6) Cooling fan: dissipate the temperature of the vibrator, so that it can work for a long time.
7) Flower wheel cylinder: Control the flower wheel to rise and fall.
8) Machine head: the transmission mechanism of the fixed flower wheel.
9) Barometer: It indicates the pressure and air pressure applied by the flower wheel to the workpiece.
10) Air pressure valve: Adjust air pressure according to actual needs, and lock the nut after adjustment. The adjustment range is generally between 1~10Kg/cm². 11) Countertop: the platform for processing the workpiece.
12) Vibration box: control the action program of the machine.
13) Vibration tube: fixed vibrator and steel mold.
14) Frame: Support the main body of the machine.
15) Foot pedal: In the position of the right foot, it controls the operation of the flower wheel and the steel mold.
16) Flower wheel pedal: at the left foot position, control the flower wheel up and down.
2. Function description of vibration box:
1) Amplitude display:
Its function refers to whether the resonance between the ultrasonic vibrator and the steel mold is appropriate. Rotate the sonic adjustment knob to change the reading. Generally adjusted to below 50.
2) Ammeter:
Indicates the working current of the ultrasonic. No-load indicates the state of resonance between the welding head and the system. Normally, it is 0.4~0.6A, depending on the output power. When loaded, it depends on the crimping area and the complexity and size of the flower wheel, usually 1.0~2.5 A.
3) Power output:
Adjust the output power to a different file position, the reading of the ammeter will change.
4) Upper die speed:
Adjust the speed of the flower wheel. The larger the number, the faster the speed will be; otherwise, the speed will decrease.
5) Die speed:
Adjust the speed of the ultrasonic steel mold. The larger the digit, the faster the speed; otherwise, the speed decreases.
6) Manual/automatic switch:
When the automatic gear is set, the flower wheel and the steel mold run automatically; when the manual switch is set, the operation of the flower wheel and the steel mold is controlled by the right foot pedal. Step on the foot pedal and the flower wheel and the steel mold start to work, release The pedal flower wheel and the steel mold stop running.
7) Overload indication:
The red indicator light is on, indicating that the device is overloaded. At this time, the machine should be shut down immediately, and work can only be continued after the cause is checked and the fault is eliminated.
8) Sound wave adjustment:
Adjust the resonance state between the ultrasonic vibrator transducer and the steel mold. Turn the knob clockwise or counterclockwise, the reading of the amplitude meter will change. As mentioned above, the normal reading is generally within 50.
9) Sonic test:
The function is to test whether the ultrasound is normal. Press the sonic test switch for 1 to 2 seconds to see if the overload indicator light is on and the readings of the amplitude meter and ammeter are within the normal range.
10) Power switch:
Control the power of the whole ultrasonic composite machine. The switch comes with a red indicator light, and the red light is on when it is turned on.