


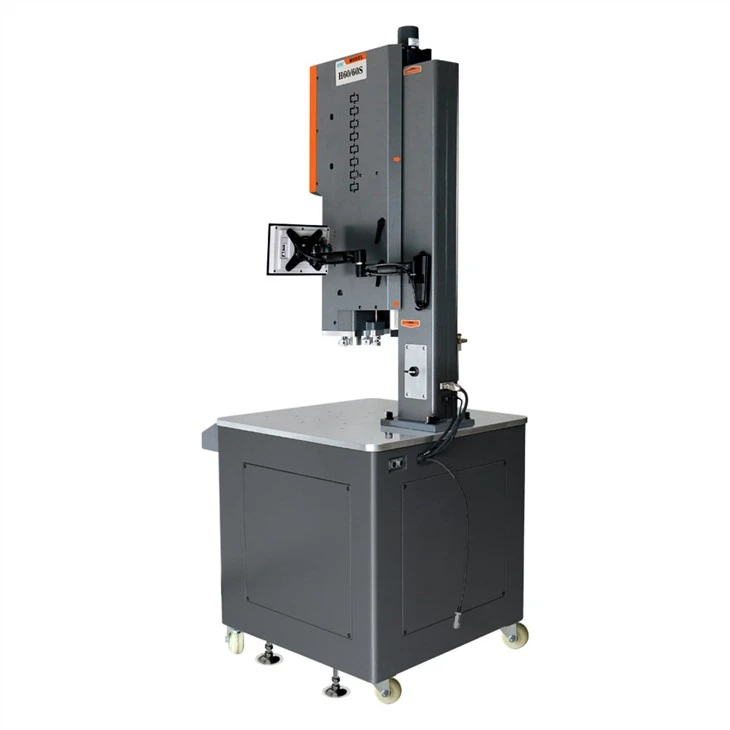

Ultrasonic Welding Machine for Plastic
Jiayuanda Ultrasonic plastic welder machine-H60/60S. It is an intelligent digital ultrasound welding machine researched and developed by us. We use perfect and optimized real-time phase-locked loop tracking technology in developing this series, which achieves more stable and reliable operation. Flexible human-machine interface configuration gains more flexible product application....
Product Description:
The existing working frequencies of ultrasonic wave used in plastic processing are 15KHz, 20khz, 30kHz, 35kHz and 40KHz. The principle of ultrasonic welding machine for plastic is to use the peak position of the longitudinal wave to transmit the amplitude to the gap of the plastic part. When under pressure, the molecules at the contact part between two plastic parts or other parts and the plastic part collide with each other to melt, so that the plastic at the contact position can be fused to achieve the purpose of processing
Product Parameter:
|
Products |
H60S series Ultrasonic Welding Machine for Plastic |
|||||||
|
Product number |
15K-4200W |
15K-3200W |
15K-2600W |
20K-3000W |
20K-2500W |
30K-1200W |
35K-1200W |
40K-800W |
|
working frequency |
15KHZ |
15KHZ |
15KHZ |
20KHZ |
20KHZ |
30KHZ |
35KHZ |
40KHZ |
|
Working power |
4200W |
3200W |
2600W |
3000W |
2500W |
1200W |
1200W |
800W |
|
Working voltage/gas source |
220V±10% / 0.2~0.7Mpa |
|||||||
|
Welding stroke |
100MM |
75MM |
75MM |
75MM |
75MM |
75MM |
75MM |
75MM |

Product features and applications:
1> The multi-level password option eliminates unauthorized changes to welding procedures
2> 100% digital control. The parameter setting of ultrasonic plastic welding machine is digital control, which can be calibrated to meet the requirements of FDA and ISO
3> Equipped with digital welding system with automatic frequency tracking, the welding precision is greatly improved
4> The welding desktop has a wide area, which greatly improves the flexibility and reliability of welding work
5> It can match the welding system with various frequencies (15, 20, 30, 35, 40, 50 kHz), so that it can be flexibly and reliably used in different welding scenarios in different industries.
Application of Ultrasonic Welding Machine for Plastic:
1. ABS: Home appliance housings, toys, charger casings; highly versatile
2. Acrylic (PMMA): Transparent parts, decorative lenses, display panels
3. PS (Polystyrene): Disposable items, instrument housings, packaging boxes
4. SAN/AS: Water cups, household goods, transparent casings
5. PC (Polycarbonate): Automotive lights, electronic housings, high-temperature resistant transparent parts
6. PP (Polypropylene): Automotive interiors, filter cartridges, storage boxes, battery casings
7. PE (Polyethylene - HDPE/LDPE): Bottle caps, plastic containers, hose fittings

FAQ:
What are the specific process requirements for workpiece structures in ultrasonic plastic welding?
Ultrasonic energy is instantaneous, and the welding line should be formed into points or lines and the transmission distance should conform to the ultrasonic welding method. Some people think that as long as it is plastic material, no matter how the joint surface can be well welded, this is a wrong understanding. When the instant energy is generated, the larger the joint area is, the more serious the energy dispersion is, the worse the welding effect is, and even the welding is impossible. In addition, ultrasonic wave is transmitted longitudinally, and the energy loss is proportional to the distance, and the distance should be controlled within 7.5cm. The welding line should be controlled between 0.3-0.8mm as the best state, and the wall thickness of the workpiece should not be less than 2mm, otherwise it cannot be welded well, especially for products requiring water tightness.
How to Adjust an ultrasonic welding machine for plastic?
I. Initial Setup and Mold Alignment
1. Securing the Bottom Mold
Place the workpiece into the bottom mold, ensuring it sits flat and stable without wobbling; tighten the base clamping plate to ensure the upper and lower molds are perfectly vertically aligned.
2. Installing the Welding Horn (Upper Mold)
Apply a small amount of specialized ultrasonic coupling grease to the contact surfaces of the horn, transducer, and flange; tighten the screws evenly in a diagonal pattern.
Note: Dust or scratches on the contact surfaces can cause energy loss and excessive heat generation.
3. Vertical Alignment
Manually lower the machine head until the horn contacts the plastic part's surface; ensure the gap is uniform all around with no one-sided rubbing.
Ensure perfect mating with any positioning ribs or locating steps on the plastic part; misalignment can lead to burn-through or uneven flash.
4. Rough Adjustment of Head Limits
Lower limit: Set the lowest downward position of the horn, leaving sufficient allowance for the plastic welding process.
Upper limit: Ensure the horn rises high enough to allow loading and unloading of parts without scraping the workpiece.
II. Resonant Frequency Tuning
1. No-Load Test (Without Workpiece)
Power on and enter the automatic frequency tracking or test mode; press the "Test" or "Sonic" button:
Normal: Stable current, crisp and uniform sound, no harsh noise or violent vibration.
Abnormal 1: High current, overheating, or high-pitched squealing → Frequency mismatch; re-tighten the horn or fine-tune the frequency knob.
Abnormal 2: Weak output, unable to melt plastic → Loose horn, lack of grease on contact surfaces, or frequency drift.
2. Automatic Frequency Tuning (Newer Digital Models)
Remove the workpiece (no-load state);
Press and hold the "AUTO TUNE" button for 3–5 seconds;
The equipment automatically matches the horn's resonant frequency; the screen displays the standard frequency (19.5–20.5 kHz for 20 kHz models; 14.5–15.5 kHz for 15 kHz models);
Save the parameters after tuning is complete; do not manually alter the frequency arbitrarily.
III. Cylinder Air Pressure and Downward Pressing Force Adjustment
1. Air Source Standards
Standard air compressor regulator settings: 0.2–0.6 MPa. Thin-walled/small parts: 0.2–0.3 MPa; thick/hard plastic or fiberglass-reinforced materials: 0.4–0.6 MPa.
2. Three-Stage Pressure Logic (found on most machines: rapid descent, welding/hold, and ascent)
Rapid descent pressure: Set lower to avoid high-speed impact damage to plastic parts.
Welding pressure: Primary parameter. Insufficient pressure results in inadequate frictional heat and weak welds (cold joints); excessive pressure causes instant crushing and material flash, resulting in an overly thin weld layer and poor strength.
Hold pressure: Slightly lower than welding pressure; allows molten plastic to cool and set, preventing spring-back or cracking.
3. Cushioning Adjustment
Throttle valves at both ends of the cylinder regulate descent and ascent speeds; slow descent for small parts to prevent crushing damage, while speed can be increased appropriately for large parts.
IV. Four Key Welding Parameter Settings
1. Delay Time
The duration between the welding horn reaching the contact position and the activation of ultrasonic waves.
Thin parts: 0.1–0.3s; parts with raised ribs or tall profiles: 0.3–0.8s (allows the horn to seat fully before vibration begins).
2. Welding Time (Fusion Duration)
Small, transparent ABS/PS parts: 0.15–0.4s;
PP / Nylon / Fiberglass-reinforced plastics: 0.4–1.0s;
Large-area housings and thick-walled parts: 1.0–2.0s;
Excessive time: Severe flash, whitening, burn-through, or part deformation; insufficient time: Weak welds (cold joints) or parts easily pulled apart.
3. Hold Time (Cooling and Setting)
Continued downward pressure for cooling after ultrasonics stop: 0.3–1.5s;
Crystalline materials (PP, PA, POM): Longer hold times are recommended to reduce cracking caused by internal stress. 4. Power Settings
1000–2000W (Small Machines): Small parts: 30%–60% power; Large areas, fiberglass-reinforced materials, or thick plastic: 70%–100% power.
Insufficient power results in incomplete fusion; excessive power causes cracking or stress whitening due to vibration.
V. Test Welding and Fine-Tuning Process (Standard Machine Setup Sequence)
1. Perform a test weld on one piece using low pressure and a short welding time.
Disassemble the product and inspect the weld seam:
Whitening at the seam or separation upon prying: Insufficient fusion → Increase welding time / Increase air pressure / Increase power.
Excessive flash, cracking, or surface scratches: Excessive energy → Reduce welding time / Lower pressure / Reduce power.
Welded well on one side but weak/incomplete weld on the other: Mold misalignment → Re-align and ensure parallelism between the upper and lower molds.
Air bubbles or delamination in the weld seam: Nylon/PC material is damp → Pre-dry the plastic parts.
2. Incrementally adjust parameters, changing only one setting at a time (adjust either time or air pressure, not both simultaneously).
3. Perform continuous test welds on 5–10 pieces; save the parameters once strength, appearance, and flash levels are stable.
For more details of Ultrasonic Welding Machine for Plastic, please feel free to contact us !



Send Inquiry
